

The evolution of technology has allowed us to carry out many more operations with convenience and speed. However, it has increased the ease to violate the privacy of individuals or organizations. Online threats have increased, including identity theft, violations and fraud (here there is a real-time map where you can see, with your eyes, the cyberthreat everywhere over the world and every time).
A Clark School study at the University of Maryland is one of the first to quantify the near-constant rate of hacker attacks of computers with Internet access: every 39 seconds on average and affecting one out of three Americans every year. Moreover, 43% of cyber-attacks target small businesses and as if a pandemic wasn’t scary enough, hackers leveraged the opportunity to attack vulnerable networks as office work moved to personal homes.
The cybersecurity industry is rapidly growing every day. Although more resources are being deployed to counter cyber attacks, the nature of the industry still has a long way to go before we can, as a whole, catch up with these threats. We need to take all security measures at our disposal.
One effective method to protect your personal information from unwanted thefts, is data encryption. This type of protection becomes even more essential when you want to send a file with private information to a specific recipient.
On this page, you’ll find:
- The pros and cons of the 9 best solutions when it comes to sending an encrypted file.
- How Cubbit Private Links can be a 100% secure file transfer and an easy to use solution that you should try for free today.
1. How to send a file encrypted with Microsoft Office
How many people just once have thought about “how to protect a file with a password?” The first solution is Microsoft Office. Yes, you probably already know Office, yet lots of people are not familiar with the possibility to encrypt a file with this software. You can add a password to a Word file to prevent that someone external could take over your sensible documents.
Step 1. Open the Microsoft Office file you want to protect (a financial sheet? an important business presentation?...)
Step 2. Click on File, you can find it on the upper-left corner of the screen
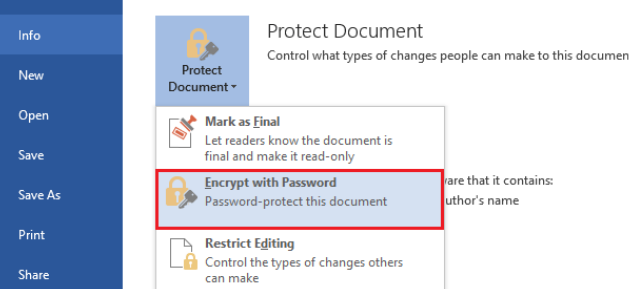
Step 3. Then, a column opens and there is a menu. You have to click Info
Step 4. Click Protect Document and you will see many options
Step 5. Click Encrypt with Password and choose the key you prefer.
Step 6. Confirm your password and click OK. The key has just been added to the Microsoft Office file to prevent it from unwanted opening.

Microsoft Word is an easy-to-use tool and allows you to encrypt files with a password. Once encrypted, you can send the file through any email system.
However, this is an unsophisticated and primitive solution that offers a minimum level of protection. And there isn’t flexibility: you encrypt only word files. If you want to encrypt a file in Excel you have to repeat the procedure with that file. The same thing happens with PowerPoint!
For personal use, it is an effective tool but if you need to regularly send encrypted files I recommend adopting other solutions that we’ll show you!
All in all, the vote is: Excellent - Very Good - Good - Average - Poor
2. How to encrypt a pdf with Adobe Acrobat Pro
Adobe Acrobat Pro is a renowned tool in the business world. Thanks to its special feature you can protect your PDF files. As always, the first step is to create an Adobe account. After completing these preliminary procedures, download the software installation file. Then click log in with your Adobe account and you can see the main screen.
- Launch Acrobat over your machine
- Now select and open the PDF file which you want to make a password-protected
- Select file option from the Acrobat window and go to Properties
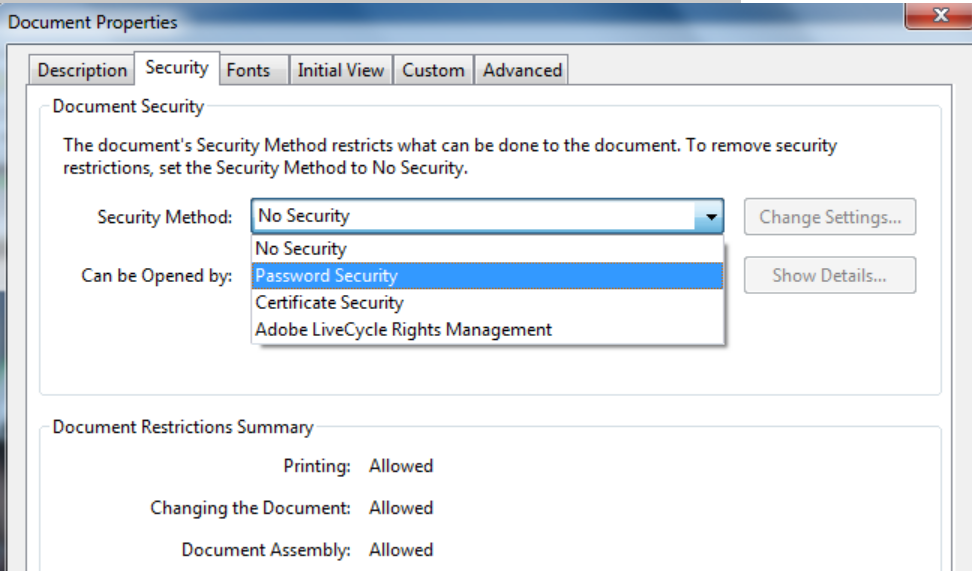
- In Document Properties window choose the Security tab
- From the Security Method drop-down list, pick Password Security
- Now from the window, checkbox the option required a password to open the document

- Type a password in the Document Open Password field and click OK
- You will be asked to type the password again and then click OK to save the PDF file
By opting for the above-discussed procedure you will be able to add a password to your existing PDF file. Now you always have to enter the right password security key to open the PDF document. Doing this will keep your PDF data safe and secure from illegal actions.
It is available for both Windows and Mac and is paid for it has a base price of 18.29 euro/month)

Once again, Adobe is a convenient tool to use that offers different possibilities, besides encryption. It’s a flexible tool (you can protect different types of files, including PDF) but has a level of security that is not particularly high.
So, our vote is: Excellent - Very Good - Good - Average - Poor
If you are looking for a business cloud storage that offers maximum security, while also being super easy to use, you should try Cubbit! This is a different service compared with the previous tools… Cubbit is an investment for your own business and also for your company.
3. Share files securely with Cubbit private links
Cubbit is a distributed, secure, encrypted green cloud storage and the first distributed cloud in the world. With Cubbit you can store and share files in total privacy because this is the only business cloud storage service that provides 3 layers of security. Every file is:
- Protected by design with zero-knowledge encryption that guarantees that no one, not even the provider, can access your files.
- Split into chunks: the encrypted file is split into some chunks which are multiplied to ensure redundancy and constant uptime.
- All these chunks are spread across Cubbit’s peer to peer network: each of the shards are stored on a different Cubbit boxes, called a ‘Cell’. These cells don’t contain the user's files but encrypted shards of people's files. So, this procedure allows the retrieval of the payload even if some individual cells go offline.
This way it is mathematically impossible to access the data stored!
“What’s the purpose of all of this, you ask? To give you simple tools to increase your security”
Now we’re going to talk about how to send an encrypted file.
Step 1. Download Cubbit on your device
Step 2. After downloading, click on the icon Cubbit and then click icon folder
Step 3. Choose the file you want to send and put it in the folder.
Step 4. Right-click on file and a menu containing commands to manipulate the file is presented
Step 5. You can choose between two options: “Get Cubbit link” or “Share on Cubbit”. In this article, we will explain to you the first option. So, click Get Cubbit Link
Step 7. The main window will be like this:
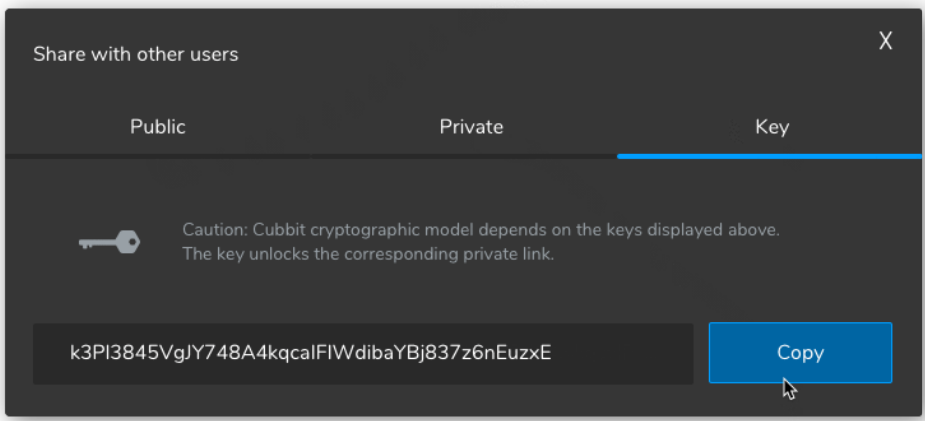
Step 8. If you want to send a file that only the recipient can see, you copy the Private link and Key Link. So, if you want to share something via a private link, you ought to share the encryption key as well. The main tip is: send the encryption key through a different application than the one you used to send the private link. That is, don’t you use Signal to send the key if you used it to send the private link!
Take note: we have explained to you just one option, which is how to send an encrypted file through a private link, but Cubbit has other interesting peculiarities that you can discover on his site!
Related reading: How to protect data in the cloud: 9 best tips of 2021
As you can guess… Privacy, security, comfort have a price. What is the price you are willing to pay to get these?
Cubbit offers different plans and based on your business needs you can choose the one that fits you better. We must add that Cubbit is the first cloud provider without a data center, so it recycles internet resources and turns them into encrypted web services that are cheaper. So it makes you pay for a service, not the maintenance. Without data-centers, Cubbit drastically reduces cloud costs and waste, this means top performance at a competitive cost.

Currently, Cubbit is a recent and young innovation, but it has been designed to revolutionize the world of cloud storage. Cubbit is a solution to share encrypted files and it has huge potential! It’s secure, sustainable, and easy on your money. For these reasons, Cubbit is a great solution at a convenient price.
Our vote is: Excellent - Very Good - Good - Average- Poor
4. How to encrypt a file with LibreOffice
LibreOffice is known by a lot of people to be a Microsoft Office free version. Anyway, it’s an effective tool if your aim is to encrypt files.
LibreOffice makes encryption dead easy. You can encrypt your important files using strong AES encryption effortlessly in the process of saving them
There isn’t much additional work that goes into saving a document with encryption. Start by either creating a new blank document to save immediately, or you can write a document and save it after. You also have the option of opening an existing file and re-saving it with encryption.
Step 1. Download and launch LibreOffice on your computer
Step 2. When you have a document that you want to encrypt, click File in the top menu of LibreOffice. In the drop-down select Save As
Step 3. A new window will open for you to choose a location for your file and to name it.
Step 4. Shift your focus to the bottom of the window. You’ll see three checkboxes. You want the one labeled Save with password and check that box
Step 5. When you’re ready, press Save
Step 6. A new window will open up with a couple of input fields to enter a password for the file. If you’re good with things the way they are, you can stop there and click Ok.
There is an option to reach better security.
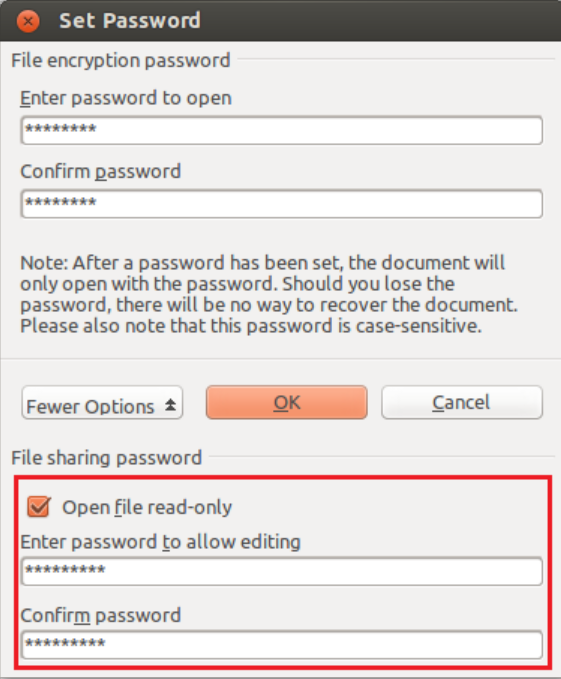
Step 7. If you want more security, click Options below the password fields.
That will extend the window to reveal the option to add an additional password for editing.
- With the first password that you set above, someone can read the file but not edit it.
- The second password would be required for that.
Check the box and provide a password to enable it.
Before you press Ok you need to remember your password. There’s no way to recover them, and there’s no way to get your documents back if you forget.
Step 8. After you press Ok, your document will be encrypted.

Libreoffice is an easy free tool, very attractive features for people, and allows you to send encrypted files. However, it is a software that could create problems if the recipient has a different version and is also a flexible solution.
All in all, the vote is: Excellent - Very Good - Good - Average - Poor
As we have seen, those tools allow you to protect a file and send it safely. However, your interest could be the creation of an encrypted zip file or an encrypted folder, not a single file… Don't worry! Now you will find a solution to your issues.
5. How to create and send a volume encrypted with Veracrypt
Veracrypt is a tool that works for Windows, Linux, and Mac and that allows you to perform the encryption of volumes and partitions, with different types of algorithms, so that with a key it is possible to access the data. The most relevant feature allows encrypting external devices and the ability to create hidden and encrypted volumes, which are made visible only by launching the tool itself and inserting the encryption key. VeraCrypt uses on-the-fly encryption to protect your data.
STEP 1. Download Veracrypt on your PC: then connect to its official website.
Once the download is complete, start the file .exe that you have obtained and complete the installation of the program. The main window will be this:
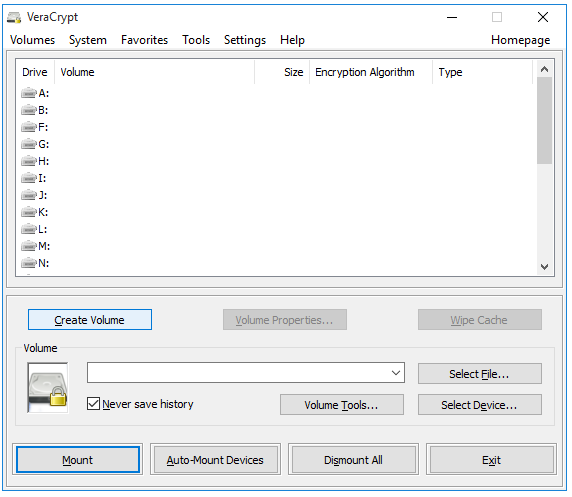
STEP 2. Click Create Volume to activate the VeraCrypt Volume Creation Wizard. You find three options:

STEP 3. Select the first option. In this section, we will create a container file, an encrypted volume that is stored within a single file that can be renamed, moved, copied or deleted like any other file.
STEP 4. After, click Next to select which type of volume you would like to create. You can create a Standard or Hidden volume. In this article, we will show you how to create a standard volume.
STEP 5. Make sure that Standard VeraCrypt Volume is selected and click Next and Select File to choose a name and location for your VeraCrypt container file you are about to create. You will need to remember where you put it and what you call it.
STEP 6. Click Save to close the Specify Path and File Name window and return to the Volume Creation Wizard window
STEP 7. Click Next to activate the Encryption Options screen. Here, you can choose a specific method (or algorithm) to use when encrypting and decrypting the files stored within your VeraCrypt container. The default options are considered secure, so you should probably leave them as they are.
STEP 8. Finally, choose a passphrase and click Format to begin creating your standard volume.
VeraCrypt is now ready to create a standard encrypted volume within a container file and it will now create a file named My Volume on the Desktop, as specified above. This file will contain a 250 MB VeraCrypt standard volume container, which you can use to store your files securely. VeraCrypt will let you know when it is done.
Remember: when you send your VeraCrypt container files to someone make sure you send the password by a separate secure route – encryption is only as good as your password security

Despite VeraCrypt being a complex solution, we conclude that it is an excellent solution to encrypt files and send them safely. So our vote is: Excellent - Very Good - Good - Average- Poor
6. How to create and send a secure zip file with 7-Zip
7-Zip is a solution that allows you to create encrypted files that can be shared with other users without creating "volume" files, you can password-protect files by using the 7-Zip compressed file manager, available for free and with an open-source license.
First, you have to download 7-Zip, then you select the files you want to archive and encrypt.
- Right-click on the folder you want to protect to bring up the menu:
- Select 7-Zip
- Then select Add to Archive
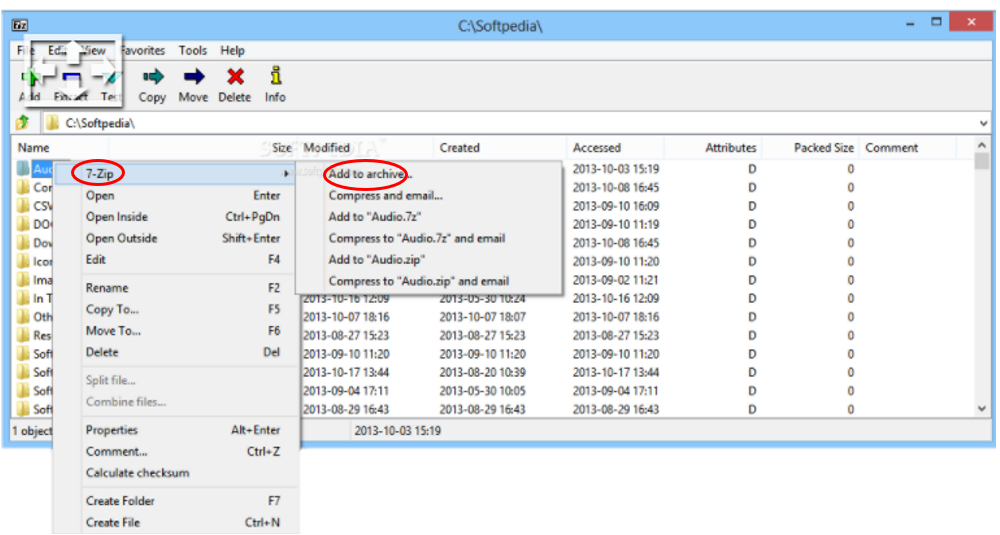
- 7-Zip will then pull up a window with several drop-down menu options.
- On Archive format, select Zip.
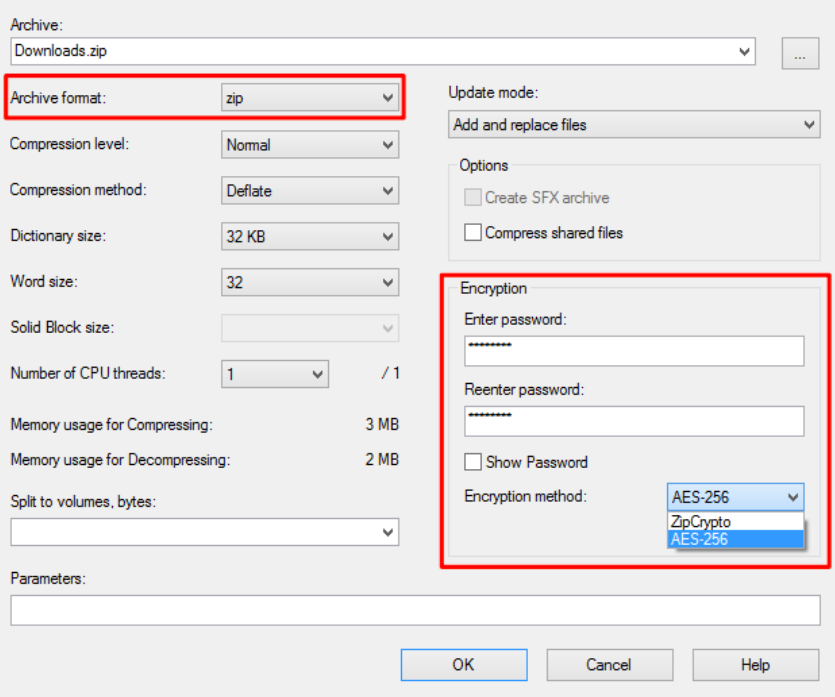
- If you do opt to go with Zip, be sure to select the AES-256 encryption method instead of the weaker ZipCrypto method.
- Enter your password into the provided boxes and click OK to create your encrypted archive file. Whenever you create a password-protected 7z file, you know that it’s securely encrypted!
You can finally open the encrypted archive you just created: then double click on the archive, enter the password and you can extract it.

7-Zip is a solution to encrypt files and send them but it is not very convenient. In fact, it presents different problems: it is vulnerable to the most sophisticated attacks and few people have installed this system. This makes it impractical for the recipient to receive the files. Our judgment is: Excellent - Very Good - Good - Average - Poor
Now we are going to introduce you to three tools that are different because they are email services. These ones allow you to send easily an encrypted file through an end-to-end encrypted email software (in other words, a method of transmitting data where only the sender and receiver can read email messages).
7. How to send encrypted data with Protonmail
Protonmail is a way to use a secure email service with built-in end-to-end encryption. Messages are encrypted at all times and those between ProtonMail users are transmitted in encrypted form within our secure server network. Because data is encrypted at all steps, the risk of message interception is largely eliminated. Protonmail uses only secure implementations of AES, RSA, along with OpenPGP (a time-tested and proven method of protecting email communications).
STEP 1. Go on the official website and Create an Account. Then, you have to Select Your ProtonMail Account Type. You can choose between a free account with limited features or more professional plans with advanced features (from 4€ to 6/€/month).
STEP 2. When you have created your account, click Log In and enter your credentials.
If you've used Gmail, Yahoo, or any other webmail system, you already know how to use ProtonMail.This will be the main window.
Please note: ProtonMail encryption works also between messages sent by ProtonMail Email addresses and Non-ProtonMail Email addresses.
Here’s how it works:
1. The ProtonMail user composes a message in ProtonMail:
2. Select the Encryption button in the bottom left of the compose box, enter a password and password hint (if desired), and select Set.
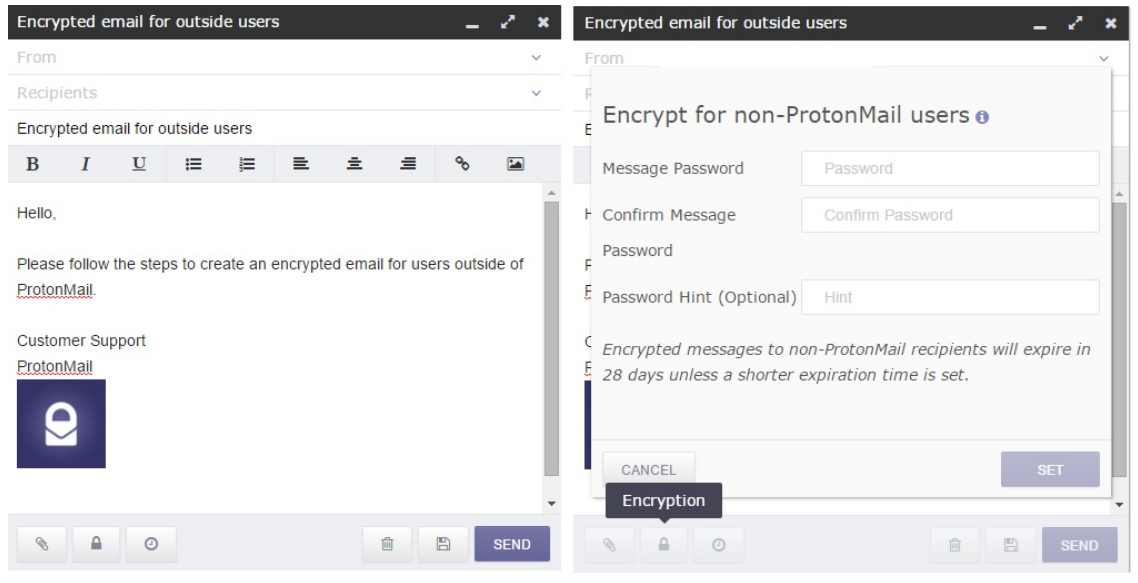
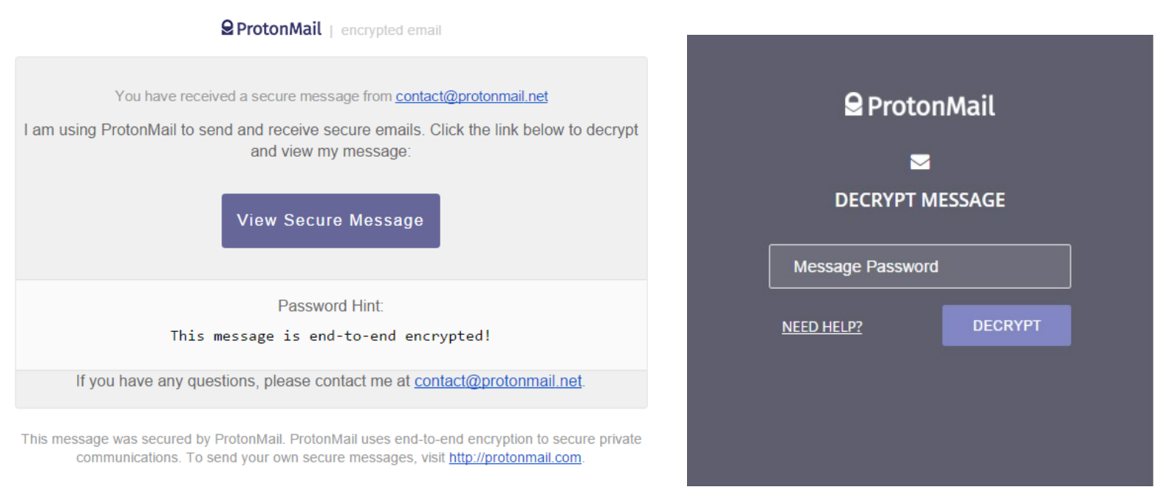
3. Upon sending the message, a generic message is delivered into the recipient's mailbox, providing them with a unique link to open the encrypted message the ProtonMail user has sent. In addition, this message contains the subject of the message, and the unique password hint if the ProtonMail user has designated one.
4. Upon clicking on the link, the recipient is asked to enter the password the ProtonMail user has set in step 2.
5. Upon entering the password, the message will be decrypted allowing your recipient to view the message and reply securely

In conclusion, ProtonMail is as easy to use as any webmail service, but it protects your message archive with zero access encryption and offers end-to-end encryption for message transmission. It's an effective solution for encrypted email and very easy to use!
However, the upgrade version has a price and a limit per day of messages. All in all our vote is: Excellent - Very Good - Good - Average - Poor
8. How to send a file encrypted with Tutanota
Another tool is Tutanota. It is open-source software that offers end-to-end encryption of emails sent from one Tutanota account to another. How does it work?
Step 1. Go on the website and click get encrypted emails. Tutanota asks you which subscription plan you prefer. You can choose between a private plan or a business account. When you have chosen the best option, you have to continue with other intuitive steps (enter your email, new password, etc).
Step 2. When you have complete access to your account, click sign up and you will have at your disposal three sections:

EMAIL: here you can see all classic features owned by each email service (inbox folder, sent folder, draft folder, etc.). Through this service, you can write and send emails and attachments in complete safety. So, if you want to send an encrypted file the steps are:
- Compose your email
- Click on the section “password for ...@....com”
- Enter a password that only those who have this password will be able to open the email.
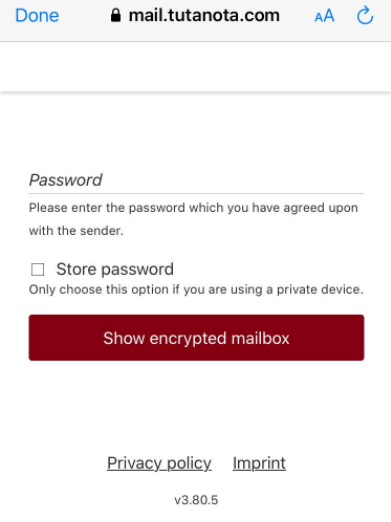
- For external recipients, who do not use Tutanota, a hyperlink is sent to a temporary Tutanota account.
- After entering a previously exchanged password, the recipient can read the message and respond in an encrypted manner.
These images show you: the email section and the window that our recipient will see:

CALENDAR: an easy calendar is shown and you can view and manage each of your events. The calendar is very special because not only all data is encrypted, but also the reminders are end-to-end encrypted.
CONTACT: in this section, you can find your contacts and for everyone, you can express: number phone, email, address, social network.

We've seen how to send a file encrypted with Tutanota in a simple and flexible way. It can be a useful tool and could replace any email system! However, we believe that the fact that it is not always accessible to customers can affect its functions and be uncomfortable! However, Tutanota offers end-to-end symmetrical encryption and this is an important point! For these reasons, our vote is: Excellent - Very Good - Good - Average - Poor
9. How to protect a file with LockBin
LockBin is a web application for sending private emails, messages, and files. It allows you to encrypt emails in just a few steps. Let me show you what they are!
Firstly, you can choose between a free account or a premium account ($10/month). The first includes one attachment up to 25MB. The second sends multiple files up to 1 GB.
If you opt for a free account, you can compose your emails by clicking, on the main screen, "send message":
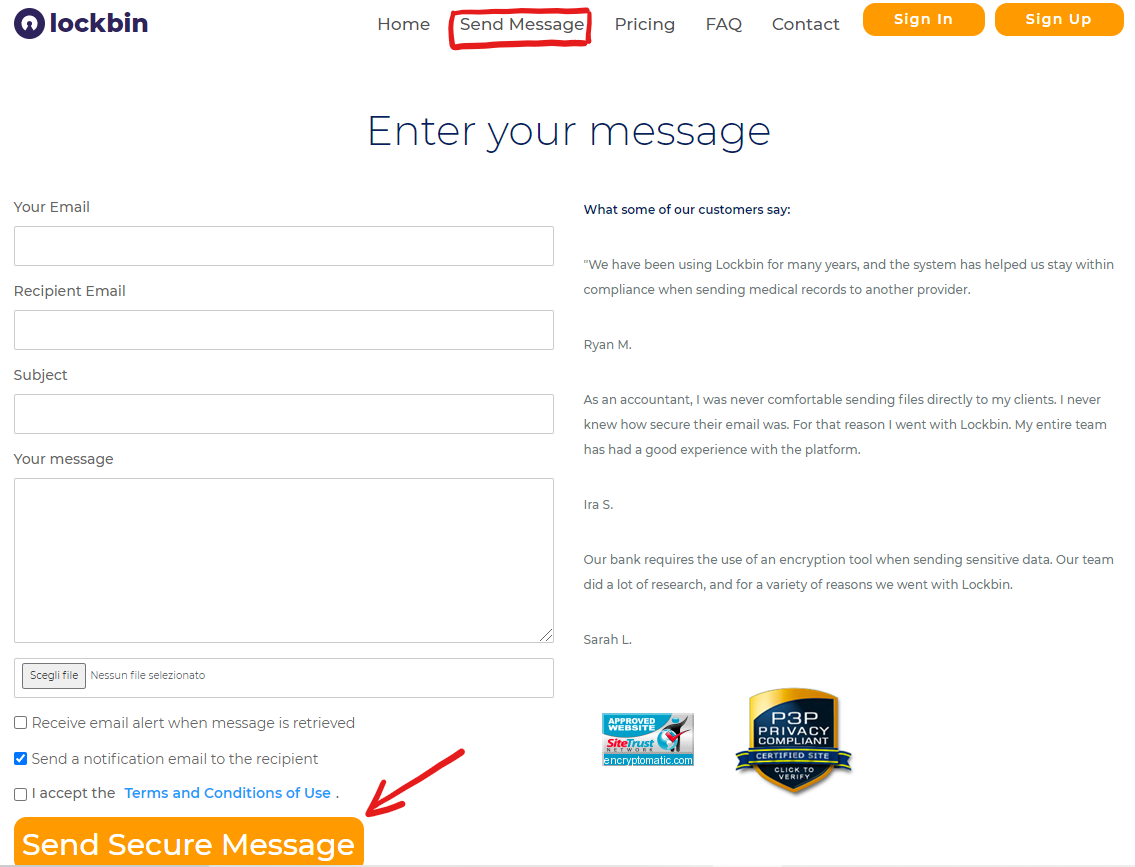
After writing the email, the content of the message will be encrypted through this service. You can also attach files to the message by pressing the “Choose File” button under the heading Attach Files. Then you are ready to click “send secure message”.
Pay attention: unlike classic email services, you have one last step to take. After sending the email, a “Message URL” for your recipient is generated. You have to find a way (another account email? SMS?) to send this URL message. If the recipient wants to open your message and is not registered yet, he has to create an account on LockBin.

Lastly, we have LockBin, a simple email service that allows you to send an encrypted file to anyone. The message in transit is encrypted and this is a strong LockBin’s strength. However, the price/quality isn’t the best and for these reasons our final judgment is Excellent - Very Good - Good - Average - Poor
Recap solutions. Who wins?
We've seen many ways on how to send a file encrypted and now we would like to highlight what we believe are some of the key elements.
In this article, our aim has been to inform you about the most effective solutions to share your files and documents safely through encryption. Each tool has been judged through security offered, level of protection provided, simplicity, ease of using the service, encrypt and share files, efficiency, the ability to send encrypted files at the lowest cost (in terms of time and money), flexibility, the ability to share files across platforms and the ability to encrypt multiple types of files, and finally value for money, the correctness of the price you have to pay considering the offer of the service.
So, who is the winner?

As it emerges from the previous table, at the first place we find Cubbit. Veracrypt and 7-Zip follow, penalised for complexity of use and low level of protection. While, at the third place, we find the email services: safe, easy but not flexible and efficient.
For these reasons, the winner is Cubbit, with an unbeatable security and a price without equal.
And you, what do you think about it? Try Cubbit for free for 30 days and let us know (no credit card required!)


